Sunday, July 28, 2013

My Potato Marbles with Ham and Cheese Recipe

Hi everyone! I'm sorry that I wasn't able to post these past few days. And how have you been lately? Hope you're all doing great! Enjoy your weekend guys! ;)

Here's another yummy recipe that I want to share with you...*wink


This does not only looks appetizing but tastes wonderful too!
Very easy to prepare as well! :)

Without further adieu, here are the ingredients you need:

a. Boiled Potato Marbles sliced in half  b. My cheese sauce ingredients c. Diced ham (King Sue Spiced Ham)

Procedure:
  1. Wash the potato marbles thoroughly. I used a clean toothbrush to scrape off the soil and washed it like 6 times.
  2. Slice the potatoes in half, drain and soak in cold water for 2 minutes. 
  3. Put the potato marbles in a pot with water and bring to a boil. You can also add salt.
  4. Make sure not to overcook the potatoes, they should be soft but not mushy. Drain and set aside.
  5. Make the cheese sauce. Cheese Sauce Procedure (I just added a teaspoon of sugar here)
  6. Fry the ham for a minute or two. Cut into squares. Set aside.
  7. In a bowl, combine the boiled potato marbles, cheese sauce and diced ham. 
  8. Mix evenly. Serve and enjoy!

This recipe is just too tempting to pass up. Try it ! :)


Image and video hosting by TinyPic

Sunday, July 21, 2013

Product Review: Jazzy Collections Compact Cream Foundation

Hi everyone! Hope you're all having a great weekend! :)

I don't know if anyone noticed (I don't want to assume that someone is constantly checking on my posts!) but I just can't seem to post everyday since I am working on night shift. I hope you understand ladies. :)

Anyways, let's now proceed on today's product review. Shall we? *wink


Yes, it's the Jazzy Collections Compact Cream Foundation in CF-04. I bought this last month at SM Fairview Department Store and it costs Php550 ($12) if my memory serves me right, sorry I'm quite forgetful..ugh! And I don't have the box anymore, I immediately put it in trash mainly because I don't keep boxes or whatever packaging...that's just me. hmm. But if you're really curious of what it looks like, it's just a plain black box with some information about the ingredients. With regard to the price, I admit I was kinda hesistant to try this product when I looked at the price tag. haha! Luckily, I've encountered a very accommodating SA, I guess she felt that I'm a customer who needs to be fully convinced on the product before I give in. So, she offered to do a makeover on me and that was my first! haha. I was wearing my Ever Bilena Studio Finish Stick Foundation that time so she managed to remove my makeup first. I told her that I'm looking for a foundation that won't cake up and taaaddaaaah! I've found what I'm looking for! I love the way she treats the customers, by the way.

Let's now take a look at the quality...

The first picture is the swatch of the foundation with 2 swipes. Second picture has no product at all. Take a look at the scar, have you seen it? Please excuse my green (large) veins! Washing dishes is my favorite household chore! LOL Seriously, look at the impressive coverage! This foundation reduced the appearance of the scar.

Here is the proof of its ammaaazzinnnggg coverage. The left side of my right hand has the product and the right part has no product at all. See the difference?

I am also using this on my dark circles since this foundation can double up as a concealer. <3

What I love:

  • this foundation truly has a high coverage
  • matte and not oily on the skin
  • very soft on the skin and has a powdery texture
  • the shade absolutely matches my skintone
  • can reduce the appearance of scar / blemishes and conceal dark circles
  • doesn't cake up/ melt even on very humid weather good for oily skin
  • lasts about 8 hours until I see minimal fading
  • doesn't transfer
  • looks natural, not too heavy on the skin
  • very easy to blend
  • a little goes a long way, very economical!
  • no breakouts, doesn't clog pores
  • no unusual smell/odor
Neutral:
  • the price is justifiable with the quality of this foundation, it's not that affordable but I can say, It's worth it! *wink
What I hate:
        N-O-N-E!

Verdict: 
       I am in love with this foundation! This is one of my favorites!!!


Ladies, have you tried this foundation yet? Have you found your HG foundation already? Feel free to post your thoughts about it! :)

Image and video hosting by TinyPic

Saturday, July 20, 2013

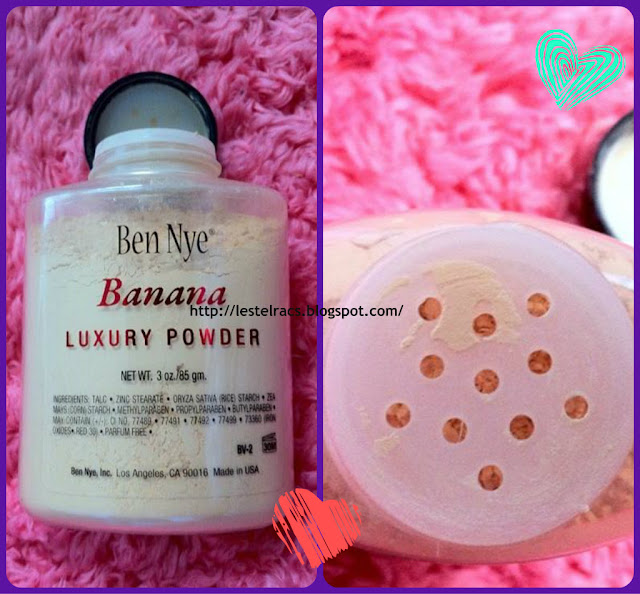
Product Review: Ben Nye Banana Powder

Hi everyone! How's your day going so far? Hope you're all doing great! :)

Today, I'll be sharing with you my own review on the famous Ben Nye banana powder. Before purchasing any product, I always do my research about it....and last month, I've decided to purchase this in 3 oz. / 85 grams from Make Up Pro for only Php800 ($18).

Honestly, when this was delivered to me..I was a bit surprised about the size.. haha I was expecting for a larger version all along! Hmm..but what's important to me is  the quality, of course. *wink

What I love:

  • this finishing powder is very lightweight 
  • has a yellow shade but completely blends on the skin
  • never cake up on me, best for oily skin
  • a little goes a long way, very economical
  • lasts for 6 hours
  • gentle on skin, NO breakouts

Neutral:
  • has a funny smell but for me it's just okay 


What I hate:

  • LARGE holes that dispenses a lot of product! 
  • will result to messy application

So, in order to solve the problem, I purchased a powder container. In this way, I can transfer a little amount of the powder here. This is actually a good idea so application won't be messy and to avoid wasting some product.

Verdict: 
I never regret purchasing this product. This is actually one of my favorites now! I love it!!!

Ladies, have you tried this yet? What do you think about this product? Feel free to post your thoughts about it! :)

Image and video hosting by TinyPic

Thursday, July 18, 2013

ELF HD Blush & Small Stipple Brush


Hi everyone! How was your day? Hope you had a good one...:)

I just received the ELF products that I've ordered from The Vanity Zone. I'm quite excited for this, actually. *wink

I got these for Php200 ($4) each , fair enough coz I heard they cost around Php 300+ in malls. Plus, The Vanity Zone is one of my trusted online shops. If you are looking for a hassle-free transaction and wants to ensure the authenticity of cosmetics and in search for competitive prices, you better check them out! :) I also got my ELF 32-piece eyeshadow palette in everyday and ELF eyelid primer in sheer from them.

SMALL Stipple Brush it is! LOL I was kinda surprised when I saw this, honestly. :) But this is totally a good brush! Later,you'll find out.. *wink


This one is also surprisingly SMALL. LOL A lot says the size is quite reasonable coz this product is very pigmented and would definitely goes a looonnggg wayy! Hmm..Let's see.

I almost got crazy when I tried swatching this hd blush. The pump wasn't able to dispense the product!!! Ugh! I almost contacted the seller thinking of maybe, I just got a defective product. I almost pumped 30 times! I just got relieved when a tiny amount came out, finally! It's good that I didn't give up pumping, huh? or else I'll be returning this and would wait for the replacement in the mail *sigh.

I should get over it, I know! haha Anyway, this ELF HD Blush is absolutely pigmented and needs a really good blending or else you'll look like a clown? I don't even want to imagine! :) And the Small Stipple Brush really helps to blend the product thoroughly! It just makes the application easier and not messy compared when you use your fingers. 

I'm in love with this shade, Headliner. This one is the lightest shade and actally I was confused whether to choose Superstar or this one. But I decided to try this one first since I just want a sheer application.

Would definitely try this on tonight and let's see about its lasting power. *wink

Ladies, have you tried this ELF HD Blush yet? Which shade did you get? How's it working for you? Feel free to post your comments :)

Image and video hosting by TinyPic

Wednesday, July 17, 2013

My Skincare Regimen

Hi everyone! How's your day going so far? I hope you're all doing great!

Today, I'll be sharing with you my current skincare regimen. :)

I was a loyal user of Pond's facial foam for the most part of my adolescence.
Until last year, a friend introduced me to St. Ives Apricot Scrub, the one for blemish and blackhead control. BLACKHEADS, my worst enemy! LOL I am nearly done with the tube right now, and I must say, this product is definitely amazing! It reduced my blackheads and somewhat minimized the pores around my nose. I use this at least twice a week, making sure not to over exfoliate. I'm  in love with the fresh-clean scent..and oh, before I forget, I loooovvee the price as well! So affordable :) I would definitely re-purchase!*wink

That same friend introduced me to VMV Fine Finish, Pore minimizer. This one is quite pricey like around Php500+ ($12+) for just 150mL. This product gives an instant minimized pores! However, I feel that it has too much alcohol in it so I opted not to use it as often. I'm just halfway through the bottle now.

And about three months ago, I started using Olay Total Effects products (a set given to me) which includes the Age defying facial wash, Day cream that has SPF15 and Anti-ageing night cream. These products totally changed my skincare routine and it absolutely gave me wonderful results!

I'm using the Age defying facial wash in the morning and at night. During the day, I apply the day cream .. at the beginning, I've noticed that it somewhat gives me an oily-shiny face and then I observed my application and found out that I've been applying too much product on my face! Ugh! Maybe since it is lightweight, I wasn't able to watch how much product I need to apply. And since I have a dry skin to start off, that's the reason why I kinda feel oily few minutes after the application but the truth is, the product just moisturizes my skin. It amazingly gives me a smooth and oh-so-soft skin! I also love the fact that this day cream has a pump, It's way convenient to use compared to others contained in a jar. I also love the mild scent. :)


At night, after using the facial foam, I apply the anti-ageing night cream. This one is actually comparable to lotion products, which is thick. I also watch my application and make sure that I don't apply too much product or else my face will end up feeling greasy! And to be honest, even applying just a little bit of product, I usually stay infront of the fan for few minutes for faster drying. Haha I don't know if some of you are also fond of doing this! *wink

And just last month, I started using Celeteque Acne solutions oil control toner and Hydration alcohol-free toner. This is actually a "okay" product. I don't notice much difference when I don't apply it. The scent is okay for me, very mild. I apply this after cleansing. During those days that I need to wear makeup, I opt to use the oil control toner.

I also have Celeteque Hydration Facial moisturizer which is oil-free. I love the way it moisturizes my skin yet doesn't give an oily-face feeling. It's clear and has no scent. I apply this after the toner on days that I'm wearing makeup since it somewhat makes the application smoother and makes my makeup kinda last longer, I'm not that sure but anyway, I'm still observing how this product affects it.

I also have the Celeteque Advanced Anti-aging anti-wrinkle facial moisturizer. I use this at night after applying Olay night cream. I usually apply this around my eyes, forehead, around my nose and chin area.

How about you ladies? Feel free to share your own skincare regimen. :)


Image and video hosting by TinyPic

Tuesday, July 16, 2013

My Specialty: BICOL EXPRESS Recipe


Hi everyone! How's your day? Hope you are all doing great! :)


Today, I'll be sharing with you my most requested recipe, Bicol Express! Yummmmm! :D


Disclaimer: This photo might stimulate your brain, "I feel hungryyyyyy....." *wink

Here are the Ingredients:


  • 1 kilo of diced pork
  • 2 liters of water
  • 3 cups of coconut milk
  • 3 tbsp of shrimp paste
  • 8 pcs green chilli fingers,chopped
  • red chilli pepper (optional)
  • 1 medium onion, diced
  • 6 cloves of garlic, minced
  • beef knorr cubes
  • 2 tbsp. of cooking oil
  • 1 tsp. of pepper
  • 1 tbsp of sugar


Procedure:

  1. Pour 2 liters of water in a large pot with diced pork and bring to a boil. Simmer for 5-6 minutes.
  2. Remove the scum from the broth and drain. Set aside
  3. Heat a pan, add 2 tbsp. of cooking oil 
  4. Saute garlic and onion for a minute
  5. Add the chopped chilli fingers and combine 3 tbsp of shrimp paste. Simmer for 3 minutes.
  6. Add diced pork and stir
  7. Pour 3 cups of coconut milk
  8. Do not stir. Let it simmer for 2-3 minutes
  9. Stir. Add beef knorr cubes, sugar and pepper.
  10. Let it simmer for 5 minutes over low heat.
  11. Stir. Serve and enjoy!


Such an easy recipe, right? Try it!  I'm very sure, you'll love it! *wink

Image and video hosting by TinyPic

Saturday, July 13, 2013

TWENTY TWO DAYS before MY 24th

Hi everyone! How's your day going so far? Hope you are all doing good. :)

Was there a time when you actually got a to-buy-list without any idea when you could finally afford them? I'm referring to girly stuff like makeup (hell yeah!) , maybe shoes, bags or perhaps dresses and some tops. In my case, I have my makeup wishlist (more of a birthday wishlist!) haha. Since it's been my past time lately to check out reviews on beauty products, I usually take note of those that are worth buying. Hmmm!

Three days ago, I've purchased Maybelline Clear Smooth Aqua Gel Foundation in Natural Beige.
I got this for Php345.00 in SM Department Store. I was actually looking for an everyday foundation that is oil-free, since my main problem is having oily T-zone. So, I really hope that this will help lessen the oiliness particularly on my nose. Awww.

Here, I just wanna share with you SOME of the products on my WISHLIST. *wink

  • Missha M Signature Real Complete BB Cream - I'm sure you all heard about this famous Korean BB Cream, a lot are raving about its excellent coverage plus can keep oiliness at bay
  • K-Palette Zero Kuma Cover Control Concealer- Have you heard about this magnificent concealer? I've learned that this will absolutely hide your (DARK) under eye circles. Plus it can stay as long as 12 hours without fading or creasing!

On the other hand, I'm still undecided which to choose between these products :

  • Maybelline Volum' Express Magnum Waterproof Mascara  vs. Colossal
  • Maybelline Eyestudio 36H Lasting Drama Gel Liner vs. Physician's Formula Eye booster 2-in-1 Lash Boosting Eyeliner + Serum vs. Dollywink Liquid Eyeliner
  • ELF Mineral Infused Face Primer vs. Revlon PhotoReady Perfecting Primer vs. Monistat Anti-chafing gel
  • NYX Cream Blush in Peach vs. ELF Studio Blush in Mellow Mauve vs. ELF HD Blush in Headliner 
  • Graftobian Corrector Palette vs. Ben Nye Concealer
  • Dollface Contour & Highlight vs. Sleek Makeup Face Contour Kit
  • Revlon Colorstay Whipped Cream vs. liquid foundation

Which do you think is/are worth buying? Ladies, feel free to leave your comments below! :)

Image and video hosting by TinyPic

Friday, July 12, 2013

My PORK AND TOFU IN BLACK BEAN SAUCE Recipe

Hi everyone! How's your day? Mine's pretty good :).

Today, I'll be sharing with you another super easy yet absolutely delicious recipe!


Here are the ingredients you need:


  • 1/2 kilo of diced pork
  • 8 pcs. of tofu cubes
  • 1/2 cup of kinchay
  • a can of salted black beans
  • knorr pork broth cubes & pepper
  • 1 tsp. of sugar
  • 1/2 cup of cooking oil
  • 1/2 cup of diced onion & tomatoes
  •  3 cloves of minced garlic
  • 1 1/2 cup of water
Procedure:
  1. In a large pot, add water and the pork cubes, cover then bring to a boil. Let it simmer for 5-6 minutes.
  2. Remove the scum from the broth and drain. Set aside the pork cubes.
  3. Heat a pan, add 1/2 cup of cooking oil and start frying the tofu. Drain and cut to small cubes. Set aside.
  4. Heat a separate pan and add a tbsp. of cooking oil. Add the garlic and onion, saute for a minute then add the tomatoes. Saute for one more minute. 
  5. Add the diced pork and saute for 3 minutes.
  6. Add the salted black beans and stir. Let it simmer for 2 minutes.
  7. Pour 1 1/2 of water and cover. Simmer for 3 minutes.
  8. Add knorr pork broth cubes ,1 tsp. of sugar and pepper 
  9. Add 1/2 cup of kinchay. Stir and simmer for about 2 minutes
  10. Add the fried tofu cubes. Mix well.
  11. Serve hot and enjoy!


Such an easy recipe, right? C'mon, try it! *wink

Image and video hosting by TinyPic

Thursday, July 11, 2013

My First REVLON LIP PRODUCTS

Hi everyone! How's your day?

Today, I'll be showing you my first ever lip products from Revlon. *wink


It was just delivered this morning. By the way, I got these from an auction in facebook, and of course before bidding I verified first if these products are US authentic, and they are for sure.


I got these for only Php225.00 each. Such a steal, right? coz from what I've read, these cost like Php300+ in the market right now. :)

Let's now check out each of these, shall we?


Lovely color, I must say. And take a look at the cap's design, so cute!

Take a look at the swatch:


From left to right: one swipe, three swipes. The picture on the left was taken under a normal light while the picture on the right was taken using flash. The pigmentation is I think, just right for me, I want it to appear as sheer as possible, hmm.. it still depends on the event/occasion of course! :)

Let's now take a look at the other product.

Looking at the color, made me say, "It's just a usual red lipstick".

But, let's take a look at the swatch:

This just made me say, "Oh, it's not a usual red after all, it's somewhat coral-ly pink-y red!" Very interesting color! :)

I'll try these out for sure! Will give you an update the soonest. *wink

Image and video hosting by TinyPic

Wednesday, July 10, 2013

DIY : Brush Guards made from Shower Ball

Hi everyone! Hope you are all doing fine. :)

Few weeks ago, I've been reading on the importance of brush guards. Well, we all know that brush guards protect and prolong the life of these brushes and also used when drying them to preserve their shapes. I've found online stores selling these for Php 300+ each pack. Honestly I find it as an unnecessary purchase coz it seems so easy to do; however, I need a meter of mesh for me to do it. So, I've tried searching online and found sellers on ebay selling one meter for only a dollar plus free shipping but I have to wait for a month. Ugh! I hate waiting! LOL. I've also looked for this mesh at Handyman and Ace Hardware... unfortunately, it's unavailable.

Last night, I just figured out this idea and I'll be sharing it with you. This is a great project especially for all the makeup enthusiasts out there. I'm telling you, this is very easy to make and the materials are very affordable as well!

So without further adieu, let's proceed with the tutorial :)


Here are the materials you need:

  • shower ball of any color (I bought this at SM department store for only Php20.00)
  • pair of scissors
  • a needle and a thread of your desired color
Procedure:
  1. Gather your makeup brushes, set aside.
  2. Now, hold your shower ball and notice the white rope that binds the whole thing together. Next thing to do is to untie the rope so the mesh will unfold (take a look at the picture on the right).
    Here's a closer look:
  3. It's now time to take one of your makeup brushes and measure the length and width (for the brush guard)
  4. Get your needle and thread now and get those fingers working ! *wink 

 Take a look at the picture on the bottom right - that's how easy it is! You don't have to be a sewing expert to do this, okay? :)

     5. Make as many brush guards as you want! :)

Note: When you're done,you can also tie the rope back around your shower ball just like what I did. *wink

I hope you like it. What are you waiting for, make your own brush guards now! :)

Image and video hosting by TinyPic